HOW TO MAKE A BLOG BUTTON:

{like this}
1. Upload desired picture to photobucket (PB), that is if you don't have some fancy indesign suite.
2. Use tools on PB to create desired look. (ie add text to picture)
3. Save a copy of it. Than you are going to want to resize it. So "hoover" your mouse over edit, and than a drop down box should appear and than press "RESIZE".
4. for small buttons you can do the preset settings of like 160X120, but I wanted mine to be a bit bigger. So...I used 240 X 320. (you can just type those #'s into the boxes.)
5. Go to your blogger, than press on the Design Tab.
6. On your side bar, press "ADD A GADGET", add the HTML box to side bar.
7. Than you are going to copy this code and insert your own information.
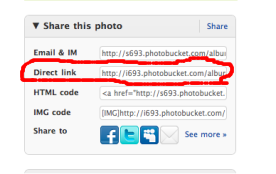
So plug in where I have highlighted in blue. For the "your image URL" you will use the direct link from photobucket.

HOW TO CREATE BUTTON CODE:
So believe me. Its not as hard as it looks. Just try it.
BUT AFTER WORKING ON THIS FOR AN HOUR too long, i just gave up, and decided you should just follow the tutorial by this lady. {click on another blog to be directed to tutorial on the button code}
{I just took the HTML coding from another blog--hence that is not the name of my blog...but you get it.
Thanks Ems!
ReplyDeleteImpressive!
ReplyDeletethank you for sharing! I've been wondering how to do that!
ReplyDeleteOh your hilarious...just giving us the link to someone else haha. I will have to try it out though! Thanks for the tips!
ReplyDeleteAshley Sloan